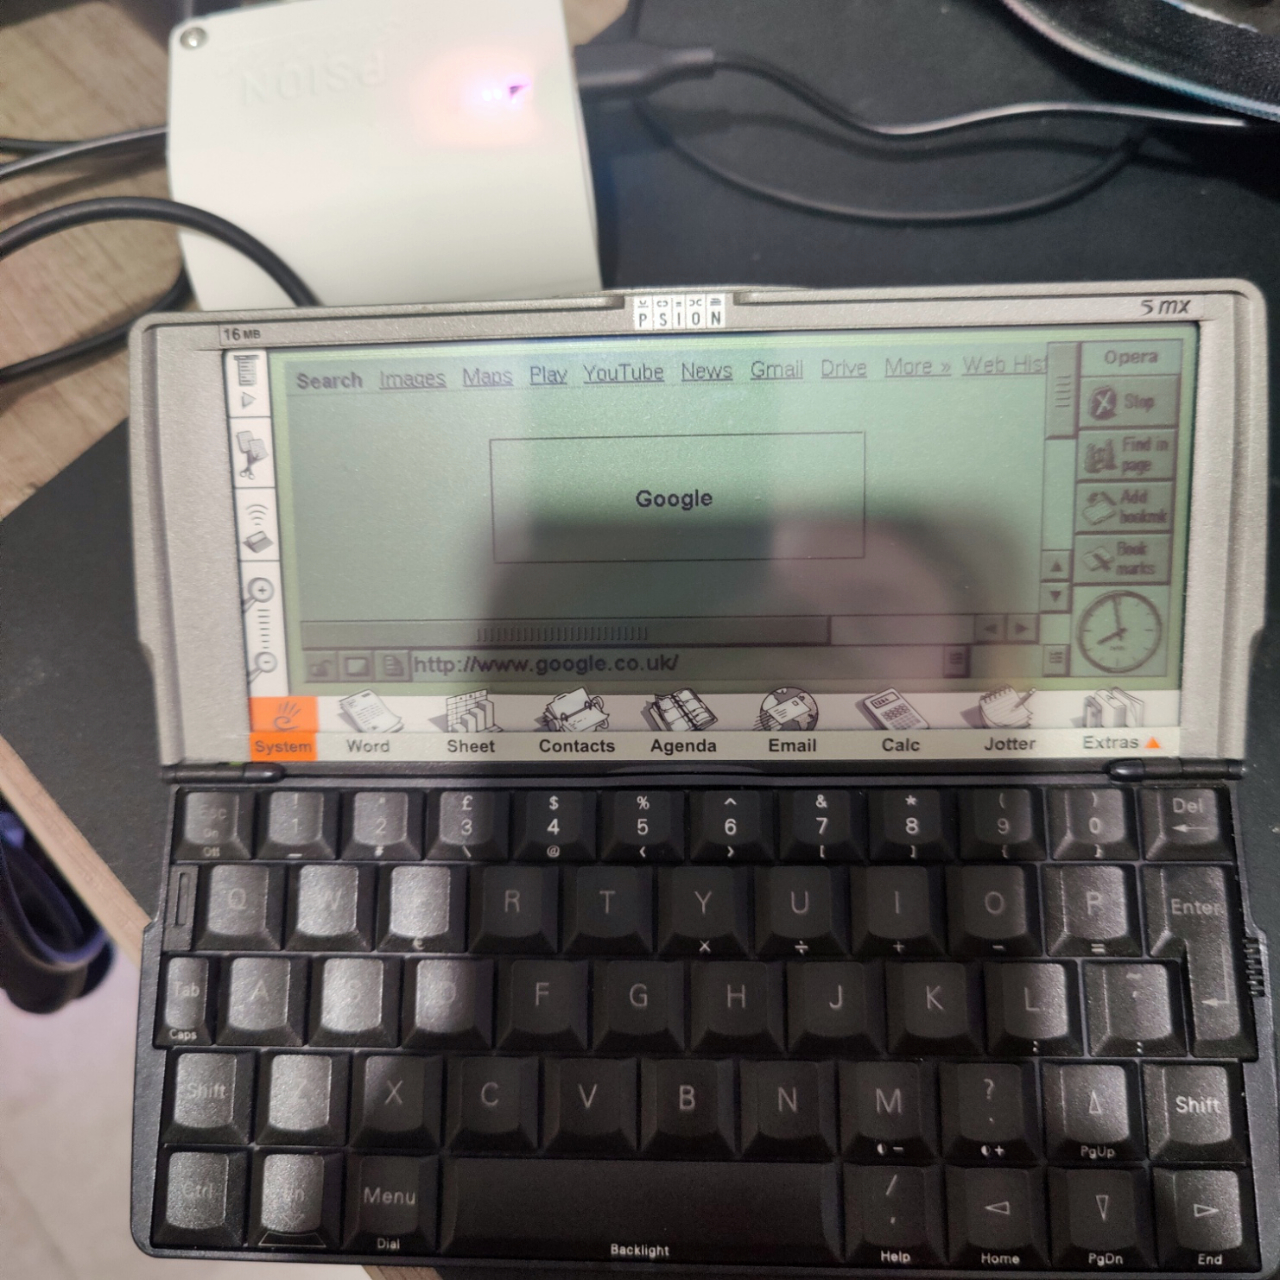
Creating the PiRS232 and playing with the Pi over serial has been leading towards an idea - I wanted to create a small, battery powered device, a sidecar that I could carry with my Psion and use as portable Linux terminal. I also managed to turn it into an Internet gateway, leading to some interesting experiences.
The idea was straightforward: take a Pi Zero W, add an RS232 board that already handles the null modem side, add a Lipo battery, power management and charging, and print a case for it. It’s taken a few months from initial idea to final design, but I’m happy the result, it’s usable and practical, and you can build one too.
Parts:
- Raspberry Pi Zero W
- Pimoroni LiPo Amigo Pro1
- Pimoroni LiPo SHIM for Raspberry Pi
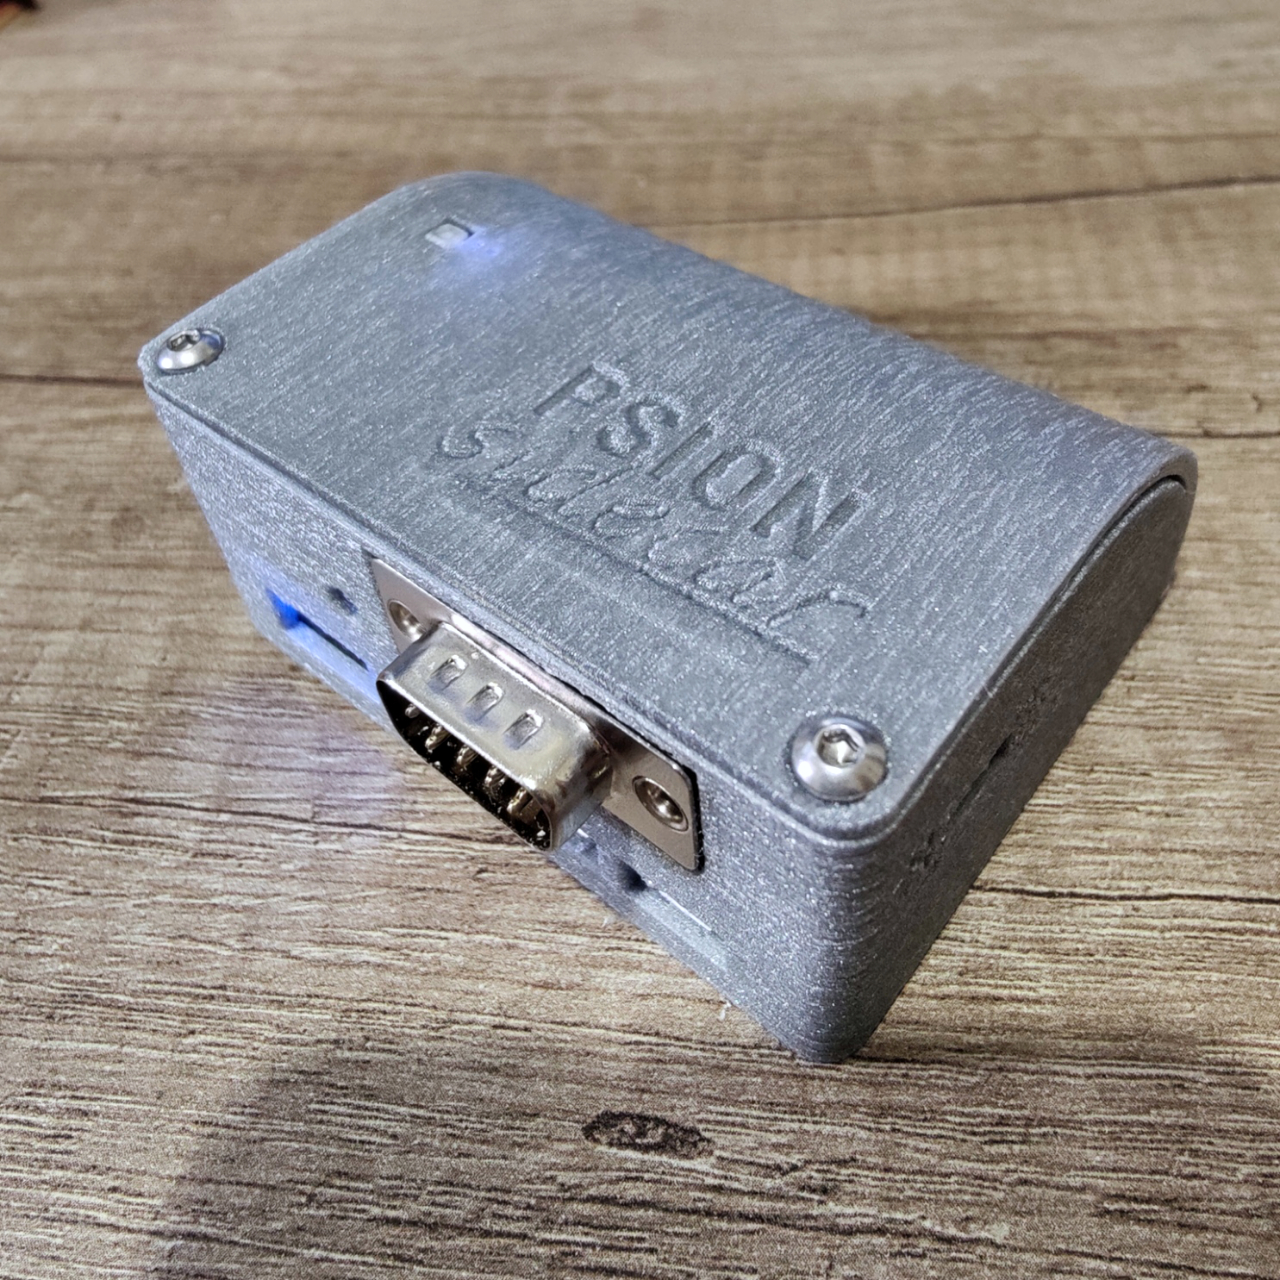
- PiRS232 board
- 2200mah LiPo Battery with JST connector
- Double ended JST connector
- 2 x 20 “long” male header
- Printed case parts available on Printables
- 3 sets of M2.5 10mm Nylon stand-offs, screws and nuts
- 3 x M2.5 x 5mm “computer screws”
- 2 x M3 brass inserts
- 2 x M3 round head hex nut 10mm bolts
Printing
The final case was printed in ColorFabb NGen Silver Metallic on a Prusa Mini. It’s durable, but a little tricky to print. All the prototypes have been printed in PolyTerra PLA Cotton White, which is is a pleasure to print with, dimensionally very stable and the matt surface allows you to sketch changes directly on to the surface. All parts are printed flat on the bed with the exception of the lid, which is printed end on, with the button hole towards the bed. Sparingly use paint on supports for the button guides and the case clip and set the clipping tight.
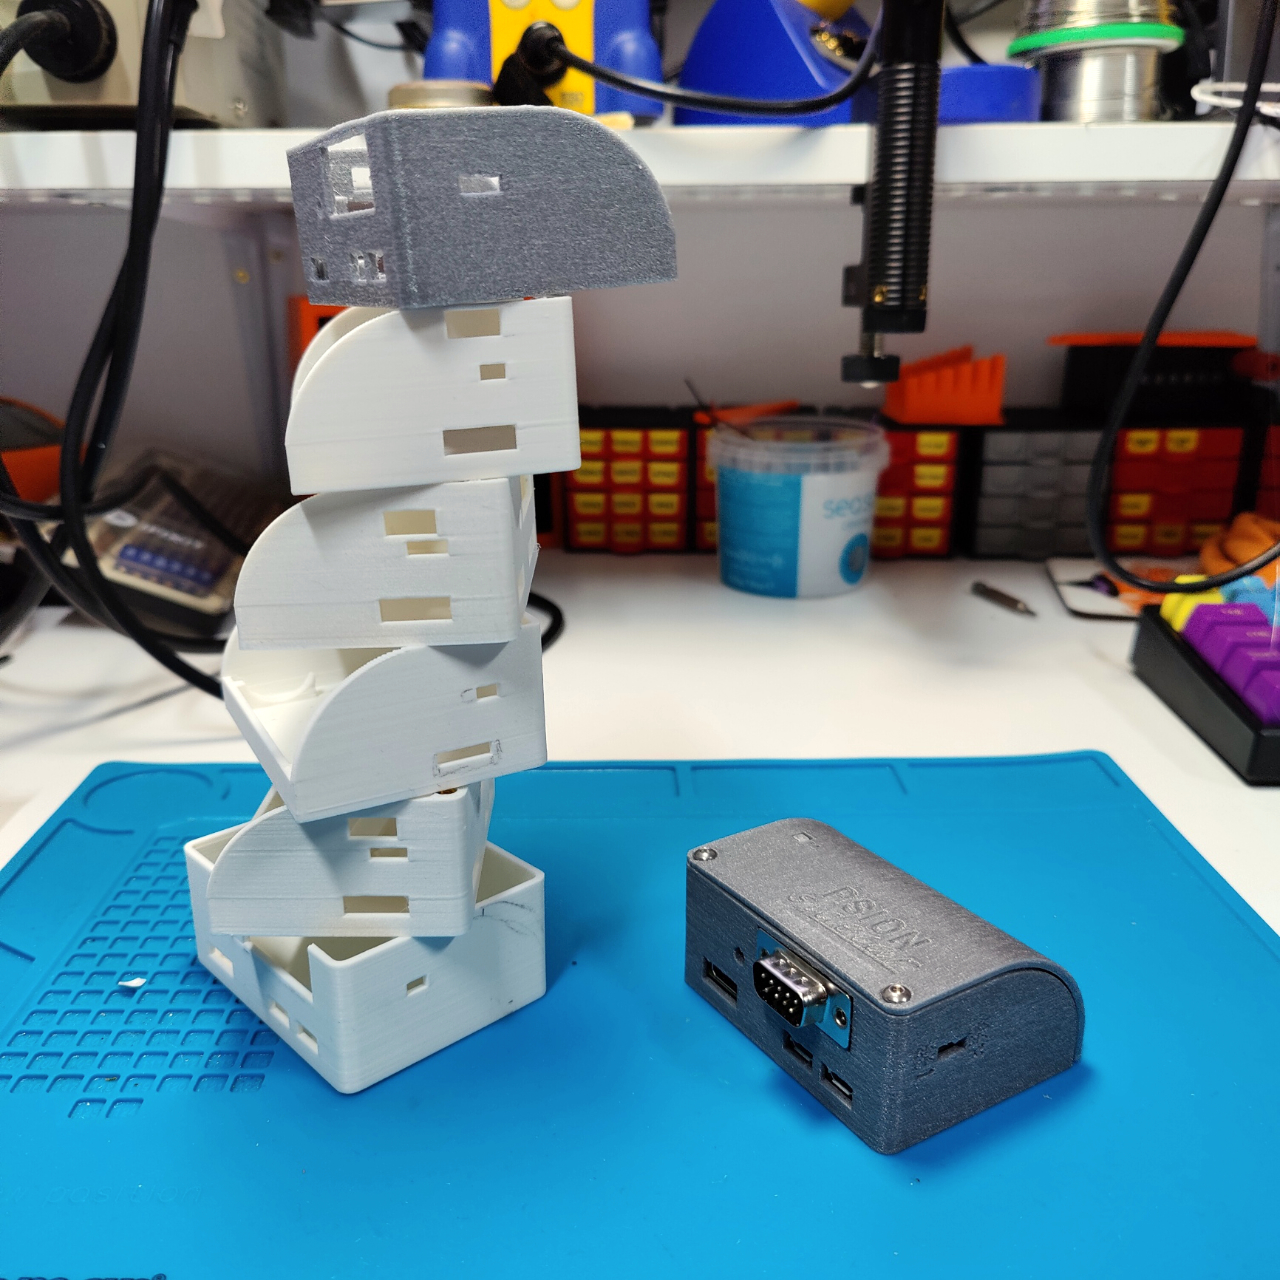
There were a few iterations of the case. This version works in a range of materials.
Build
The build is pretty straightforward and only requires through hole soldering.
To build:
- Solder the long male header to the Pi Zero W.
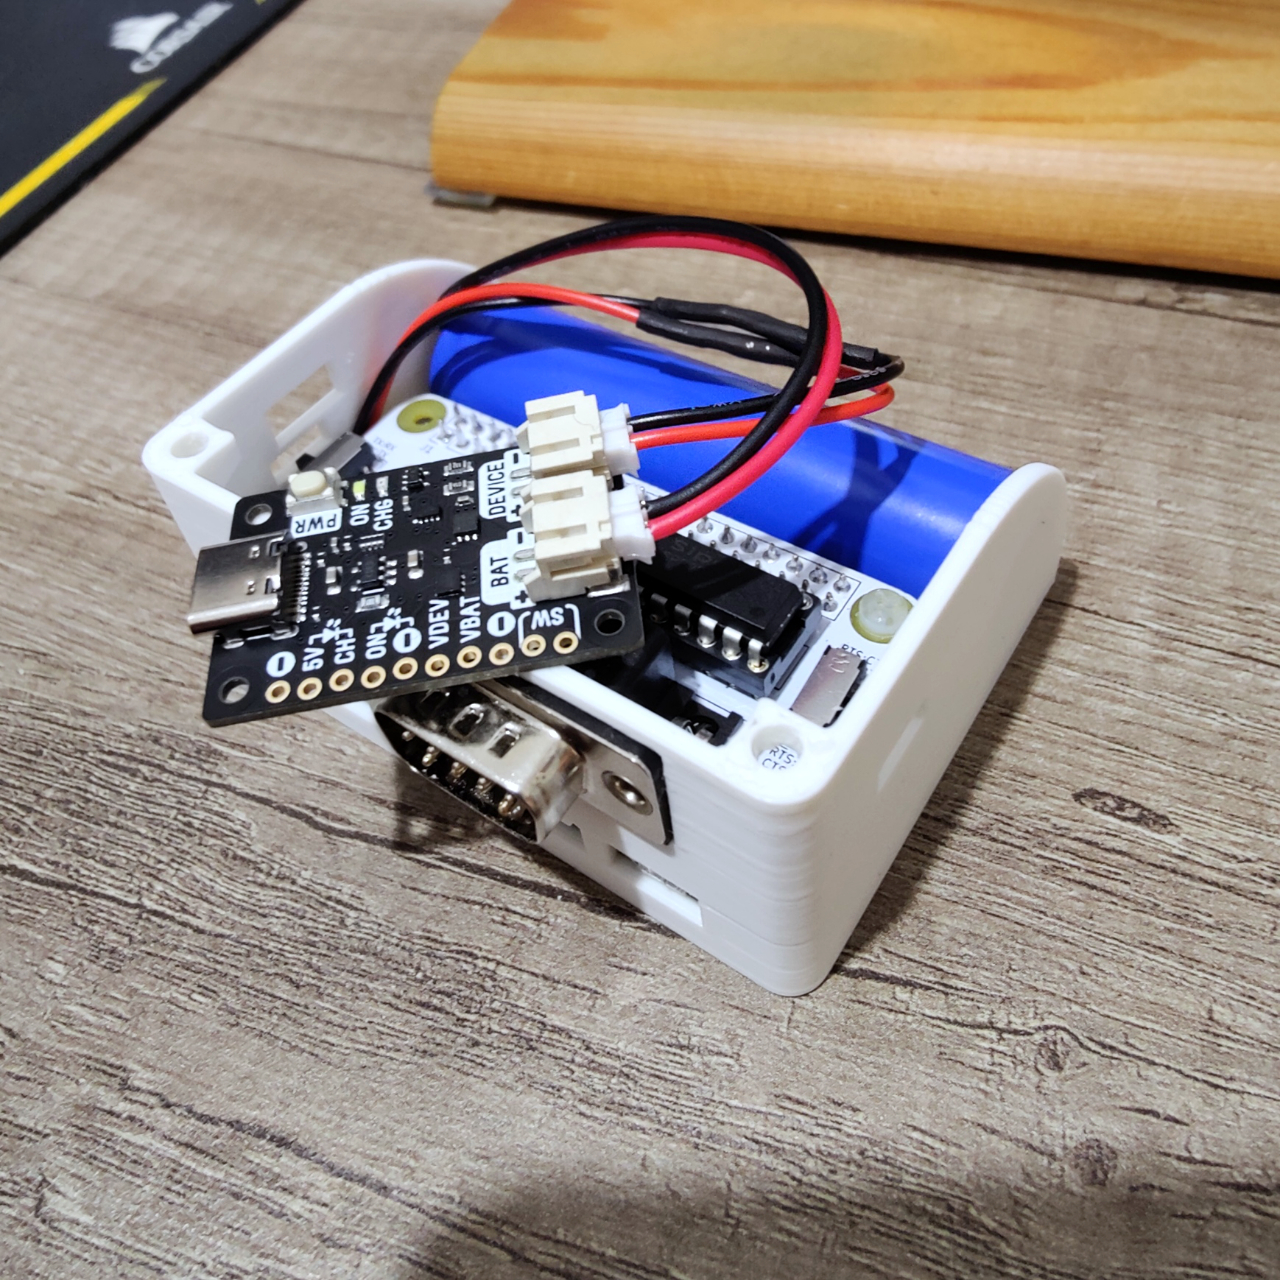
- Solder the Lipo shim as close as possible to the Pi.
- Screw the nylon stand offs on the three sides still available to you. Add nuts to the underside.
- Add the PiRS232 board to the top and screw in the nylon screws.
- You can’t add the 4th corner, since the Lipo Shim gets in the way.
- Connect the JST from your board stack to your LiPo Amigo Pro “device” connection, then connect the battery to “battery”.
You should now have a functional “stack” of boards that will run from either LiPo or USB-C (via the Amigo). When seated in the case you should have something that looks like the below image. The ports should align.
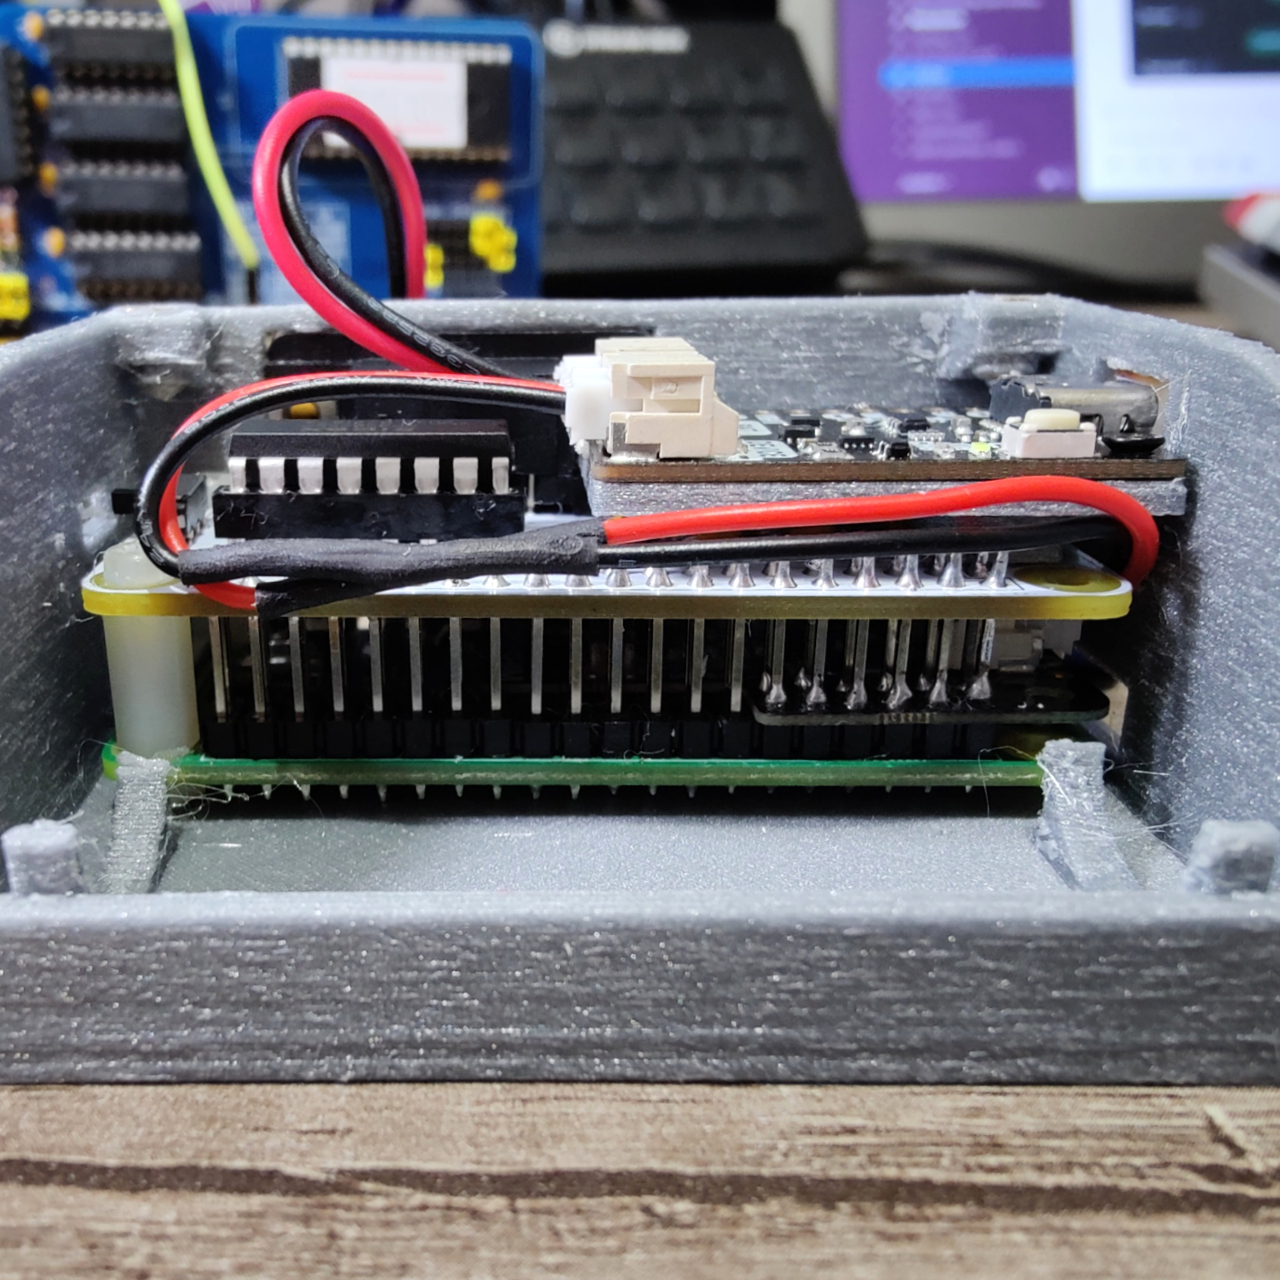
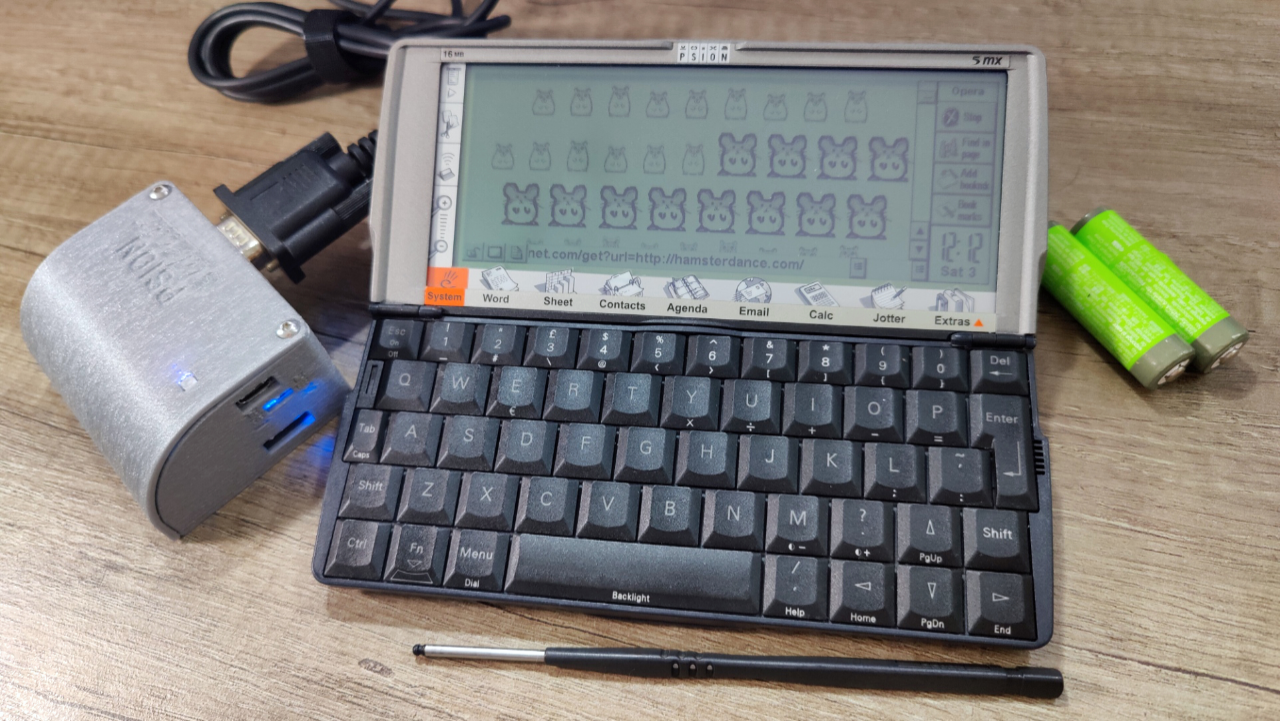
At this point follow the instructions on getting a Psion 5MX to talk to Raspberry Pi with Serial. These instructions will work on the Pi irrespective of what you intend to connect it to. This will get your Pi outputting your console over serial with RTS/CTS hardware flow control. Do this before fitting in to the case.
The threads from the stand-offs mate with the holes in the case, but too much makes it difficult to fit. Trim them down to 2mm with a knife. Slide the D-Sub 9 connector through the hole in the front and then angle the board down and under the shelf until the stand-offs lock in the holes.
The Amigo Pro is screwed in to the “shelf” piece, which is then rested on the PiRS232 and screwed in to the case. The shelf should sit flat on the PCB and obscure no components.
The brass inserts are added to the main case by using a soldering iron. Once the inserts are added, rest the button on the underside of the lid. The button should move freely. If it does not, trim the button. When fitted, the button should sit on the power button of the Amigo and freely move up and down. The clip on the back of the case fits snugly against over the back wall. If it does not, add a small piece of tape to increase the friction. Secure the lid with the two hex bolts. Do not over-tighten.
Setting up PPP
At this point, you should have your device talking to the Pi, over Serial, with RTS/CTS hardware flow control.
If your client device can support PPP, we can go a step further, and provide a PPP service on the Pi for your RS232 device. This will allow your device to use the Pi both as a Linux terminal, and as a gateway to use it’s own software to the outside world.
There’s security implications to this. It’s not the 1980s or 1990s. Exercise some caution.
We’re going to run the PPP service over serial, so please ensure you have a working a working RS232 serial terminal connection with RTS/CTS before continuing. We will also be disabling the serial console, since we’ll be the serial port for the PPP service.
Install PPP on the Pi if not already installed:
sudo apt install ppp telnetd
Edit /etc/rc.local and add the following lines before “exit 0”:
stty -F /dev/ttyAMA0 raw
sudo pppd /dev/ttyAMA0 115200 10.0.0.1:10.0.0.2 proxyarp local noauth nodetach dump crtscts passive persist maxfail 0 holdoff 1 &
On startup, this will start our PPP service with hardware flow control, and noauth on the serial port.
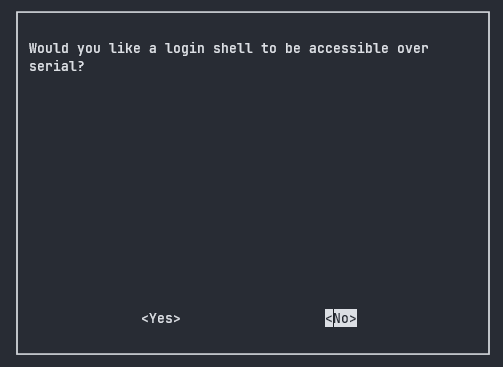
Finally, start raspi-config, disable the terminal being available over serial but leave serial enabled.
Reboot the Pi.
Setting up the Psion
We’re going to use the Psion 5MX as the client, but any PPP client that supports RTS/CTS should work here. If your client requires different settings, adjust the parameters in rc.local and reboot the Pi.
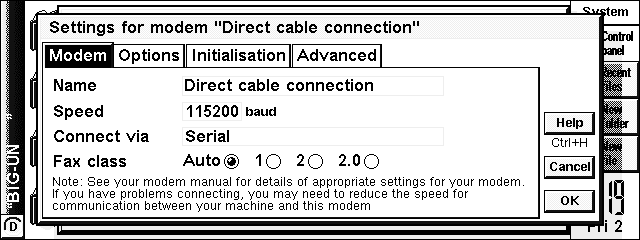
Modem Control Panel
First set-up the modem configuration:
System ➡ Control Panel ➡ Modems
Select the “Direct Cable Connection” profile.
Modem Tab
Speed: 115200 baud
Flow Control: Hardware (RTS/CTS)
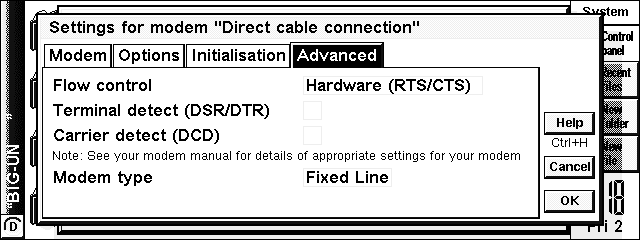
Advanced Tab
Terminal Detect OFF
Carrier Detect OFF
Internet Control Panel
Next set up the internet configuration:
System ➡ Control Panel ➡ Internet
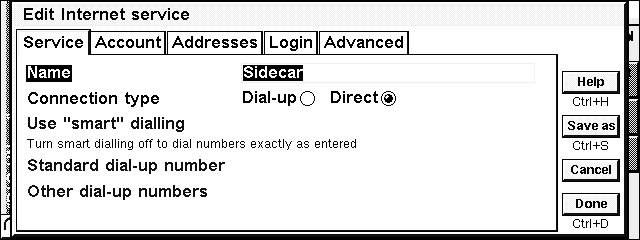
Create a new profile, named “Sidecar”.
Service Tab
Connection Type: Direct
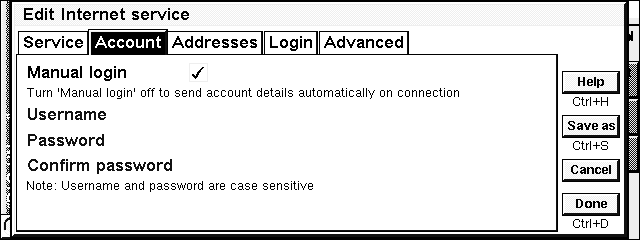
Account Tab
Manual Login: True
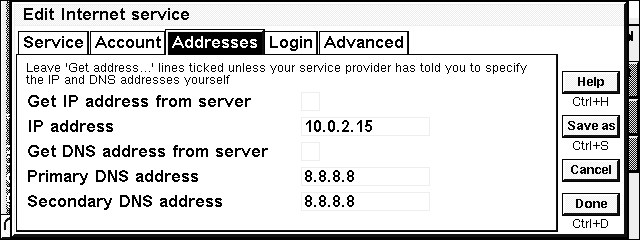
Addresses Tab
Get IP address from server: False
IP Address: 10.0.2.15
Get DNS address from server: False
Primary DNS Server: 8.8.8.8
Primary DNS Server: 8.8.4.4
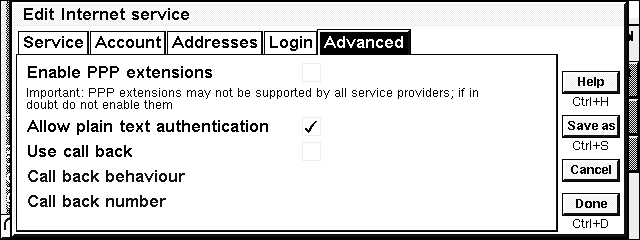
Advanced Tab
Enable PPP extensions: False
Allow plain text authentication: True
Using the Sidecar
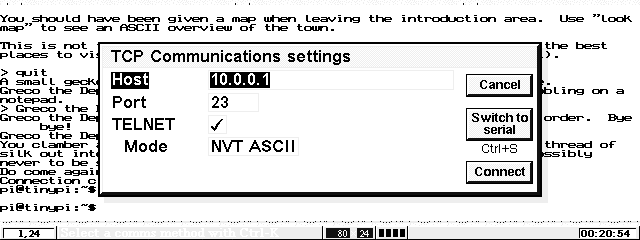
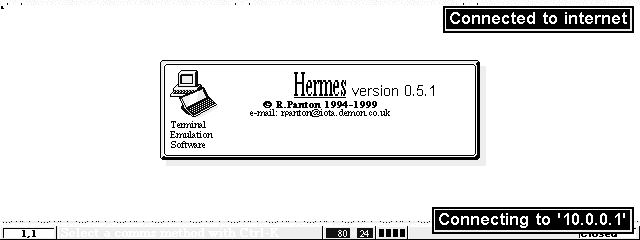
First up, the Hermes client can use Telnet to connect to clients. Change to TCP/IP and connect to 10.0.0.1 on Port 23:
Hermes will tell you it’s connecting to the Internet and then hopefully present you with your terminal login:
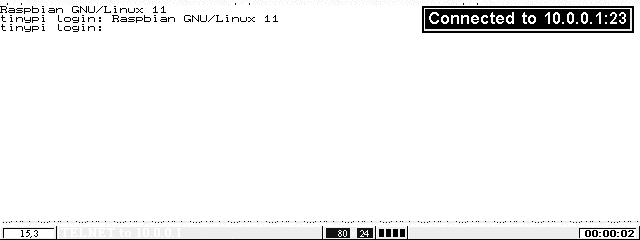
This is very similar to the serial experience, but I found it handled non-ANSI characters better out of the box than serial.
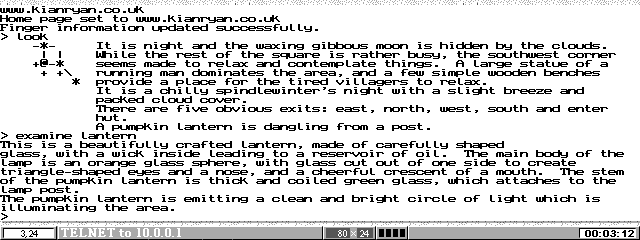
You can also connect to telnet services directly, such as the Discworld MUD, but I found it a better experience to use telnet from the Pi to the MUD. A MUD (multi-user dungeon) is an hybrid of MMORPG and text adventure. There’s a great write-up about the Discworld MUD on the Guardian.
But we could do this with the serial approach. The real power of PPP is that we can use web applications directly on the Psion. E-mail is a sticky point as modern e-mail servers, rightly, insist on encryption. The built in e-mail client works with POP only and doesn’t support encryption. Eric Lindsay lists a IMAP plugin for the Psion, and a local IMAP or POP relay on the Pi might be a good way to get around this … for another day.
So what about web browsing? Opera still make available the Psion version of the browser for download. Unfortunately, it’s only usable for 30 user days and they haven’t provided an unlock code with the download. If you can help with that, please get in touch. But it’s enough time to have fun with.
Robert Snoulton reached out and linked me to this page.
According to the page above, the below are Opera provided registration codes. The codes below work should work with the versions directly hosted with Opera above. I’m replicating them here in case the above link is lost.
Opera v5.14 / ER5 - (S5mx/MC218/Series7/netbook) e-XfaKu-WsCLh-rLaKT-y3tjW-k76bs
Opera v5.14 / ER3 - (S5/Geofox/Osaris) e-wvSrQ-NAywD-JkUEs-jcLRn-rAnfT
Our first port of call is straight to Google. The home page loads, but that’s about it. We can search, but very few results will load. Our browser doesn’t understand SSL, and with the push for everything to be served secure, suddenly a lot of the internet is no longer open to us. Let alone issues with HTML5, CSS and Javascript.
Lucky for us, there are a number of services set up for people who want to browse the internet on cough senior devices.
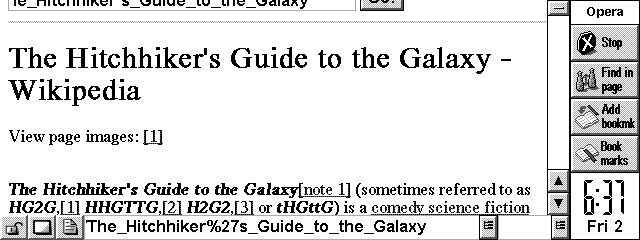
FrogFind returns results from DuckDuckGo and then reduces the complexity of pages before serving them to you over bare, unsecure HTTP.
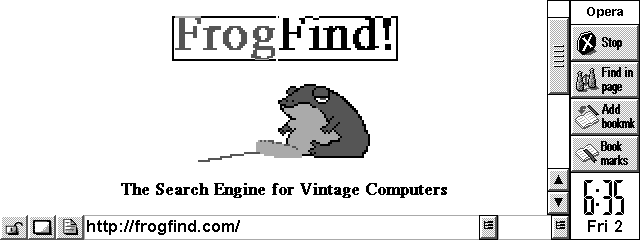
This is great for services like Wikipedia, which now (for good reason), insist on serving all their content over HTTPS only. But we’re only browsing, so it’s fine. Just be aware that you’re browsing on an unsecure device.
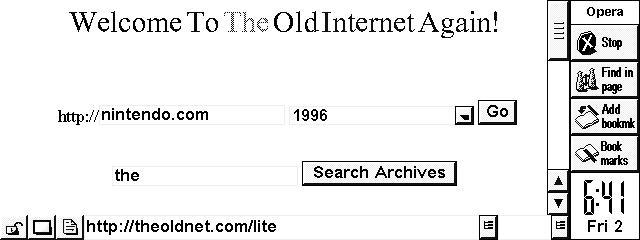
The Old Net provides a range of services, but most useful for us is a search engine and HTTP proxy for The Wayback Machine, so we can find and display old sites.
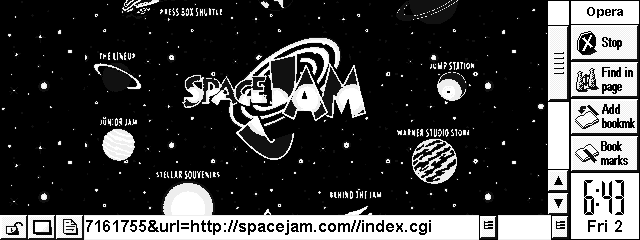
It’s pretty much an obligatory pilgrimage to return to the 1996 version of the Space Jam site. It renders pretty well here, given how many images are on the site.
Opera is really, quite responsive.
What’s next?
I started this project as a companion for my Psion 5MX, but I’ve got a Psion 3a and an Atari STE that I /should/ also be able to get online. I’m part of the way there with the 3a following the approach here. It’s fun pushing the boundaries of these devices, and modern, broadband internet is definitely a frontier these devices were not designed for. I would love to see if other people build versions of the Sidecar, and the devices they pair it with.
-
Our first Amigo Pro had a solder fault. Pimoroni replaced that.
A month in to the project, smoke, heat, noise, project died. Refused to boot, made lots of heat if we tried.
A few weeks later Les Pounder came to our rescue with a spare Pi Zero W at Play Expo Blackpool. Thank you.
When we pulled the stack apart, we found the original Pi wasn’t dead, but the SD card very much was, and the second Amigo Pro was making some interesting noises. The Pi wasn’t making the heat, the SD card was. Fresh card and we were good again.
Pimoroni said they had changed the design and supplied a third one.
This one, worked, didn’t make smoke, powered the board directly from USB-C (aha), and runs silently.
I like the Amigo Pro. I’ve got some more in the post. ↩
 There are no ads on this blog and as far as I can remember, never have been.